The Use of the Tools
June 5, 2002
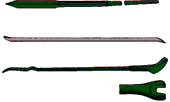
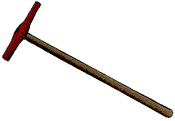
The lining bar: a tool of many functions.
Operating the track jacks was a primary use of the lining bar. Lining track gave it the name.
 Lining track required six or eight men. The track had been surfaced and partly dressed, meaning the track jacked up, leveled and ballast shoveled back in the track. The line side of the track was the side you lined from. The other side is called the gauge side. The line side, on the Michigan Branch, was the east rail. Also on the line side the ends of the cross ties were almost in a straight line. When spiking ties you spike the line side first and then spike the gauge side to the line side.
 The man lining the track sits on the rail and eyeball lines the rail. The point of lining is to line any spots that are badly out, for maybe six rail lengths and then come back and fine tune that stretch and move on. They also had a small telescope that you hand held to help line track. My father and uncle were very good at lining track with just the eyeball.
The claw bar was used to pull spikes, hold up ties and as a battering ram.
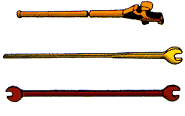 Track wrenches came in two styles. One style is like an end wrench. When you were using this wrench to apply or remove a nut, you turned the nut from left to right, as you reach the far right position, you lift the wrench slightly, roll the wrench to the left, holding pressure against the bar and at the same time going back to the left with the top of the wrench to the starting position. The wrench drops on the nut ready for another loosening move. The sounds difficult but it is the easiest method with this wrench.
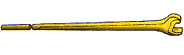 The other wrench is called a speed wrench. The jaws of this wrench are shaped differently. The handle is at a slight angle to the jaws of the wrench. When loosening the nut the jaw in the front, the jaw to the operator's right, is longer that the rear jaw. The lets you, in effect, ratchet back to the left. I believe Sears has end wrenches that use this same principle.
The shovel is a simple tool with many uses from moving ballast, tamping ties, moving ties and also being used as a chair. If you stayed on the section or extra gang more than a week most men had their own shovel.
There is a difference between shovels when you use them day after day.
When tamping ties, you usually buddied up with two other men. One man held up, or nipped, the tie. The two shovel men tamped the ties. The proper way to tamp a tie was thus. If the ballast is against the tie you turned the shovel backward, using it as a pry to move the ballast away from the side of the tie. Turning the shovel over to the normal position you start running ballast under the gap between the ground and bottom of the tie. The other tie man is doing the same thing on the other side. The shovel handle was leaned slightly away from the rail.
 You start at the rail and work out to the end of the tie tamping under the rail first. One or two men would tamp the tie a shovel width on the inside of the rail. The center of the tie was not tamped to keep the ties from becoming center bound. If you tamped the center of the tie, as time passed by, the ends of the tie would beat the ballast down, then the tie would teeter-totter because the tie was tamped in the middle. In case the tie tongs were not available you learned how to stick the corner of the shovel in a tie and move the tie around, then place it under the rail with the shovel.
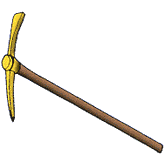
 The shovel was used on gravel and cinders. On stone they used stone forks to handle ballast and a tamping pick to tamp stone under the ties. The pick was used to loosen the ballast around and under the tie when it was removed. Now we tell why we carried the blacksmith hammer. When the picks were dulled you could send them to Greensburg for sharpening but this took time. My dad, uncle and others did the sharpening in the field. When dad and uncle sharpened the picks they did not follow the oval shape of the pick head. They would heat the pick in a fire on site and begin sharpening about 3 inches from the point and slightly straighten the point about 3 inches back. The reason for this was in the normal shape of the pick it would throw the dirt in your face. With the straightening of the point this tendency was reduced. How did you temper the ends? You stuck them in the ground and let them cool while you sharpened another pick.
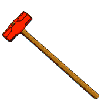
 The spike maul: after you learned to swing a maul the test was thus. On the head of the spike where the maul hit the spike, you should be able to cover the spot with a dime.
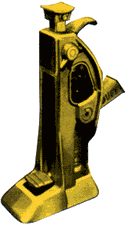 The track jack: there were two sizes of jacks. One was about 2 feet high with a lift of about 12 to 14 inches. The other, a smaller jack, was about 10 inches high with a lift of six to eight inches. The tall jacks were usually used when the track was pulled out of surface to be reballasted or retied. The smaller jack could also be
used for this work but the small lift restricted its use. The stem on the small jack had a groove cut on the top of the stem.
The track jack: there were two sizes of jacks. One was about 2 feet high with a lift of about 12 to 14 inches. The other, a smaller jack, was about 10 inches high with a lift of six to eight inches. The tall jacks were usually used when the track was pulled out of surface to be reballasted or retied. The smaller jack could also be
used for this work but the small lift restricted its use. The stem on the small jack had a groove cut on the top of the stem.
Using these jacks to line track was thus. Two jacks were used. Digging an angled hole on the inside of the track, you placed the jack stem with the groove against the ball of the rail. You had already dug out the ballast from the end of the ties. The jacks were placed about a half a rail length apart. With one man lining, the other two operated the jacks, pushing the track until instructed to stop.
Track level: a level with one end adjustable for elevation on curves.
Track gauge: used to keep gauge between rails while spiking or to check gauge at different locations.
The axe: the type of axe used was called a poleaxe. It had one blade. The part opposite the blade could be used as a hammer.
 The spike puller was used to pull spikes between the stock rail and guard rail and other close locations. To describe this tool, take a washer, cut a piece out of one side the width of a spike shank, then add a one inch square by ten inch long shank to the top of the washer. Along this shank add little balls that surround the shank about two inches apart. The claw bar is slipped under and around the ball that is above the rail and the spike is pulled one ball at a time. It works like pulling a two-headed nail with a claw hammer.
Rail chisels: these were used to cut rail. They were about fourteen inches long by one and a half inches square for five inches and then tapered on two sides as any other chisel. The end, instead of being square, had a round nose. A wooden handle about two feet long was used to hold the chisel.
Next time we will cut a rail, raise track, and etc.
Maurice Lewman
Maurice worked the Michigan Division from 1947-1981. He then worked on the Bee Line from 1981-1992. From 1947 until august 1950, he worked on the section at Shirley and Markleville. In 1950 he started firing on steam and then on through the diesels. Maurice said, "I had the pleasure of working with C. C. Staley and Ron Buser many times."
| 